
    // ************************************************************************
    // * Character - "o", Ascii - 111
    // ************************************************************************
    0x00, 0x00, 0xFF, 0xFF, 0xF0, 0x00, 0x00, 0x00,          //      #####
    0x00, 0xFF, 0xFF, 0xFF, 0xFF, 0xF0, 0x00, 0x00,          //    #########
    0x0F, 0xFF, 0x00, 0x00, 0x0F, 0xFF, 0x00, 0x00,          //   ###     ###
    0x0F, 0xF0, 0x00, 0x00, 0x00, 0xFF, 0x00, 0x00,          //   ##       ##
    0xFF, 0xF0, 0x00, 0x00, 0x00, 0xFF, 0xF0, 0x00,          //  ###       ###
    0xFF, 0xF0, 0x00, 0x00, 0x00, 0xFF, 0xF0, 0x00,          //  ###       ###
    0xFF, 0x00, 0x00, 0x00, 0x00, 0x0F, 0xF0, 0x00,          //  ##         ##
    0xFF, 0x00, 0x00, 0x00, 0x00, 0x0F, 0xF0, 0x00,          //  ##         ##
    0xFF, 0xF0, 0x00, 0x00, 0x00, 0xFF, 0xF0, 0x00,          //  ###       ###
    0xFF, 0xF0, 0x00, 0x00, 0x00, 0xFF, 0xF0, 0x00,          //  ###       ###
    0x0F, 0xF0, 0x00, 0x00, 0x00, 0xFF, 0x00, 0x00,          //   ##       ##
    0x0F, 0xFF, 0x00, 0x00, 0x0F, 0xFF, 0x00, 0x00,          //   ###     ###
    0x00, 0xFF, 0xFF, 0xFF, 0xFF, 0xF0, 0x00, 0x00,          //    #########
    0x00, 0x00, 0xFF, 0xFF, 0xF0, 0x00, 0x00, 0x00,          //      #####
Character LCDs are great for building simple embedded interfaces, they are simple to use and cheap. I use character LCDs in most of my own projects and experiments. However, character LCDs are somewhat limited. It’s hard if not impossible to display an image or a logo on the screen and you’re often stuck with the same font built into the display. Unlike character displays, graphical displays provide more flexibility and will let you display images and custom fonts. In this post I’ll talk about working with a graphical OLED display. The display I’ll talk about uses the SSD1322 driver chip from Solomon Systech.
A Simplistic View of the SSD1322
The SSD1322 driver chip contains a Graphic Display Data Ram (GDDRAM) from which it displays data directly. The SSD1322 driver chip is capable of 4-bit grayscale and hence each pixel requires 4-bits of data to represent it. The particular display we’ll use has a display size of 256 by 64 pixels although the SSD1322 chip can do 480 by 128 pixels. This understanding of the SSD1322 driver chip will suffice for this post.
Working With Images On The SSD1322
We’ll write a python script to convert bitmap (.bmp) files into source code. A bitmap is a file format that represents an image as an array of pixels, this is the image format we’ll feed to our script. However, we’ll need to edit our image before we pass it to our python script. We’ll resize the image to fit our application and then we’ll convert the image to 8-bit grayscale since we don’t have a 4-bit option in GIMP. GIMP is a free image editing tool suitable for this type of editing. Our python script will then scale the image to 4-bit grayscale and convert it to C source code.
Preparing the image
Firstly we’ll open GIMP and load a monochrome image file which we wish to convert to code. Secondly we’ll click the image menu and select “Crop to Content”. Next we’ll click on the image menu again but this time we’ll select “Scale Image”, this opens a dialog box for setting the width and height of our image in pixels. We must ensure the resulting image fits into our display size of 256 by 64 pixels. After selecting the correct image size we will click on “Scale” to resize the image.
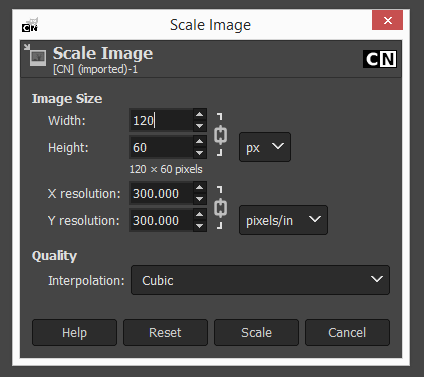
Scaling the image in GIMP.
Now let’s click on the image menu, hover the mouse on “Mode” and select “Grayscale” since our image is monochrome.
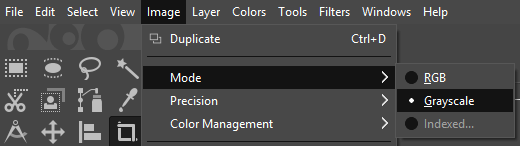
Setting the image mode to grayscale in GIMP.
Let’s click on the image menu, hover the mouse on “Precision” and select “8 bit integer” – our python script assumes that our image has an 8 bit grayscale, so this step is very important. Let’s click on the image menu again, hover the mouse on “Precision” and select “Linear light”.
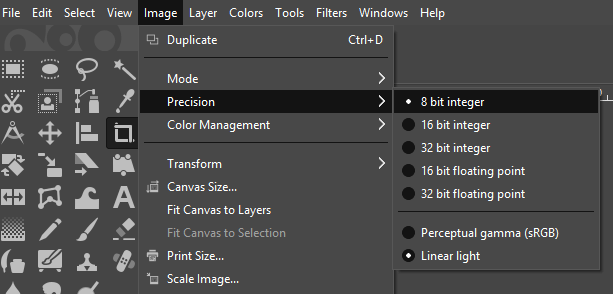
Setting the image precision in GIMP.
Finally we’ll export the data as a bitmap file. Let’s go to “File” and click on “Export As” or use the shortcut “Shift+Ctrl+E”, this will open a dialog box. Let’s click on the “Select File Type (By Extension)” at the bottom of the dialog box and select “Windows BMP image”. We then click export after setting our prefered directory and we’re done!
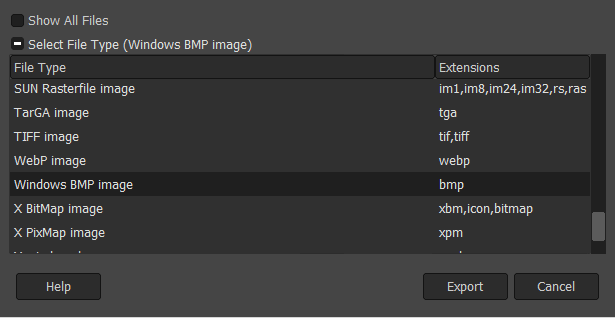
Exporting the image as a .bmp file in GIMP.
Image data structure and representation in C
We need to know how the SSD1322 driver code is going to represent images if we’re to generate image code for it. The SSD1322 driver code represents an image as a structure containing a pointer to a const array, the width and height of the array.
// Bitmap data structure
typedef struct
{
    const uint8_t * address;
    uint8_t width;
    uint8_t height;
} bitmap_t;
The image data is stored in a const array, this enables the compiler to place the array in the flash memory of the microcontroller.
const uint8_t image_bitmap[] =
{
    0x8A, 0x7D, 0xFF, 0xFF, 0xA0, 0x8C, 0x7A, 0x9A, 0xFF, 0xFF, 0xA0, 0x8F,
    ...
}
The code snippet below shows an example for initializing a bitmap structure for the file “image.bmp”. Here we create a pointer to the “image_bitmap” array in the above code snippet. The width and height of the bitmap are initialized via definitions.
const bitmap_t image =
{
    (const uint8_t *) &image_bitmap,
    BITMAP_WIDTH,
    BITMAP_HEIGHT
}
The bitmap array and structure are all found in the bitmap source file. Therefore we’ll have to expose the structure in a header file to enable its usage by the rest of the application.
// Declaration of bitmap structure extern const bitmap_t image;
Generating the image code
Now that we have a fair idea of how the SSD1322 driver code represents bitmaps let’s generate code for it. To display a bitmap image we just need to read the bitmap (.bmp) file and convert it to source code for our microcontroller. We’ll write a python script to generate the image code. The read_bitmap() function is used to read a bitmap (.bmp) file and returns an array of pixels, the width and height of the bitmap. Inside the read_bitmap() function is a call to the “matplotlib.image” method imread() which performs the actual file reading.
def read_bitmap(filename):
    """
    Reads a bitmap file and generates an array of pixel data.

    filename (str): The filename of the bitmap.
                    Ensure the bitmap is in the working directory.

    Returns (tuple): A tuple which contains image data.
                     The tuple items are:
                         rows (int)
                         columns (int)
                         bitmap_array (list)
    """
    # Read image and scale grayscale values from 8bit to 4bit
    img = mpimg.imread(filename) // 16
    # Unpack image properties
    rows, columns = img.shape

    bitmap_array = img.tolist()
    bitmap_array = flatten(bitmap_array)

    return (rows, columns, bitmap_array)
Every column address of the SSD1322 represents four pixels, therefore we need to ensure that the width of the bitmap array is divisible by four. If a bitmaps width isn’t divisible by four, we add dummy data (essentially 0’s) to the end of each column. The SSD1322 chip represents two pixels in one byte but the read_bitmap() function represents one pixel in one byte thereby utilizing half of the byte since each pixel is 4 bits wide. Hence we merge two pixels into one byte of data in the format_bitmap() function.
def format_bitmap(bitmap):
    """
    Combines two adjacent bytes into one byte.
    This is required because the SSD1322 OLED driver represents two pixels
    in one byte with each pixel being 4 bits wide. Call add_dummy_data() before
    calling this function to ensure the incoming data is even in width.

    bitmap (list): A list containing pixel data - each byte contains one pixel
                   but each pixel occupies only half of a byte.

    returns (list): A list of hex strings - each byte is two pixels.
    """
    output = []
    index = 0

    size = len(bitmap) - 1
    while index < size:
        # Merge two bytes(pixels) into one
        output.append((bitmap[index] << 4) + bitmap[index + 1])
        # move on to the next two bytes
        index += 2
    # Representing data in string format makes for easier code generation
    return ["0x%02X" % i for i in output]
Code is generated by writing the image data and associated comments to source (.c) and header (.h) files. To make writing the data easy we’ll create a function bitmap_to_array() which will organize all our bitmap data in a dictionary called “bitmap_table”.
def bitmap_to_array(bitmaps):
    """
    Generates an 'array' representation of the bitmap data.
    This data is then used to generate a header (.h) file and a source (.c) file.

    bitmaps (list): An array of the filenames of the (.bmp) files to be
                    converted.

    returns (dict):
        A nested dictionary containing bitmap data.
            bitmap_table (dict)
            |
            \--> bitmap name (str) : bitmap parameters (dict)
                                     |--> 'Width'  : bitmap width (int)
                                     |--> 'Height' : bitmap height (int)
                                     \--> 'Bitmap' : bitmap pixel array (list)
    """
    bitmap_table = {}

    # Create a translation table for the filenames
    t = {ord(i) : '_' for i in string.punctuation}

    for filename in bitmaps:
        # Ensure filename is a valid C variable name.
        file = filename.split('.')[0].lstrip(string.digits)
        file = file.translate(t)

        bitmap_data = tuple()
        rows, columns, data = read_bitmap(filename)

        # Ensure bitmap width is divisible by 4.
        bitmap_data, dummy_added = add_dummy_data(data, columns, rows)
        # Merge adjacent pixels into single bytes
        bitmap = format_bitmap(bitmap_data[0])
        # Represent the width of the bitmap as the SSD1322 does, where each
        # column address represents 4 pixels.This requires a division by 2 (each byte represents 2 pixels)
        # but we divide by 4 because format_bitmap() halves the width of the bitmap.
        width = bitmap_data[1] // 4
        height = bitmap_data[2]

        bitmap_table[file] = {
                              'Width'  : width,
                              'Height' : height,
                              'Bitmap' : bitmap,
                             }

    return bitmap_table
Because the bitmap_to_array() function takes a list of bitmap filenames, we’re able to generate one pair of source (.c) and header (.h) files for multiple bitmaps. Lastly we’ll create the bitmap_to_c() function which does the final code generation. This function makes use of the “bitmap_table” to write bitmap data to source (.c) and header (.c) files.
def bitmap_to_c(bitmaps, filename="resources"):
    """
    Generates a header (.h) file and source (.c) file in the working directory.

    filename (str): The filename of the output files (.c and .h files).

    bitmaps (dict): A dict of ".bmp" filenames to be converted. The bitmap
                    files have to be in the active directory.

    Returns: None
    """
    bitmap_table = bitmap_to_array(bitmaps)
    # Generate header file
    with open(filename + ".h", mode="w") as f:
        f.write("/**\n"
            " * @File Name\n"
            " *   " + filename + ".h\n *\n"
            " * @Description\n"
            " *   This header file provides access to the installed bitmap\n"
            " *   This code was auto generated with ssd13322_resource_utility.py\n"
            " */\n\n"
            "/**\n"
            " * Section: Included Files\n"
            " */\n\n"
            "#include <stdint.h>\n"
            "#include \"ssd1322.h\"\n\n")

        for bmp in bitmap_table:
            f.write("// Bitmap Structure\n"
                    "extern const bitmap_t " + bmp + ";\n\n")

    # Generate source file
    with open(filename + ".c", mode="w") as f:
        f.write("/**\n"
                " * @File Name\n"
                " *   " + filename + ".c\n *\n"
                " * @Description\n"
                " *   This source file contains pixel data of the installed bitmap\n"
                " *   This code was auto generated with ssd1322_resource_utility.py\n"
                " */\n\n"
                "/**\n"
                " * Section: Included Files\n"
                " */\n\n"
                "#include \"ssd1322.h\"\n\n"
                "/**\n"
                " * Section: Module Definitions\n"
                " */\n\n")

        # Create bitmap size definitions for each bitmap file
        for i, bmp in enumerate(bitmap_table):
            w = bitmap_table[bmp]['Width']
            h = bitmap_table[bmp]['Height']

            f.write("#define BITMAP_" + str(i) + "_WIDTH    " + str(w) + "u\n"
                    "#define BITMAP_" + str(i) + "_HEIGHT   " + str(h) + "u\n\n")

        # Create bitmap body for each bitmap file
        for bmp in bitmap_table:
            rows = bitmap_table[bmp]['Height']
            bitmap = bitmap_table[bmp]['Bitmap']

            # Write bitmap data to file
            f.write("/**\n"
                " * Section: Bitmap Body\n"
                " */\n\n"
                "// Each byte represents two pixels\n"
                "const uint8_t " + bmp + "_bitmap[] =\n{\n")

            # Write bitmap data in widths of 12 bytes each
            size = len(bitmap)
            rows = size // 12
            remainder = size % 12
            index = 0

            for i in range(rows):
                f.write('    ')
                for j in range(12):
                    f.write(bitmap[index] + ', ' )
                    index += 1
                f.write("\n")

            if remainder > 0:
                f.write('    ')
                for i in range(remainder):
                    f.write(bitmap[index] + ', ')
                    index += 1
                f.write("\n")

            # End of bitmap data
            f.write("};\n\n")

        # Create bitmap structure for each bitmap file
        f.write("/**\n"
                " * Section: Bitmap Structures\n"
                " */\n\n")
        for i, bmp in enumerate(bitmap_table):
            # Create and initialize a bitmap structure
            f.write("// " + bmp.capitalize() + " Bitmap Structure\n"
                    "const bitmap_t " + bmp + " =\n"
                    "{\n"
                    "    (const uint8_t *) &" + bmp + "_bitmap,\n"
                    "    BITMAP_" + str(i) + "_WIDTH,\n"
                    "    BITMAP_" + str(i) + "_HEIGHT\n"
                    "};\n\n")
Working With Text On The SSD1322
Text and image data representation in our SSD1322 driver code is very similar. Text is typically stored in an embedded system as a complete font. All the application has to do is look for the image representation of a character and output it to screen. Most fonts come as truetype font (.ttf) or opentype font (.otf) formats. We’ll add code to our python script to render font characters. But first let’s look at how the text is structured.
Text data structures and representation in C
We require an additional array to store data about each glyph or character in the font. We’ll refer to this array as the font table. Each glyph in our font is like its own mini bitmap. So we’ll need a structure for each font table entry.
// Font table entry data structure
typedef struct
{
    uint16_t glyph_location;
    uint8_t  glyph_width;
    uint8_t  glyph_height;
    uint8_t  glyph_baseline;
    uint8_t  dummy_added;
} font_table_entry_t;
The font table is stored as a constant array of font_table_entry_t structures. During code generation the font array is sorted alphabetically to enable easy access of glyph metadata.
// Font table contains glyph metadata
const font_table_entry_t Lato_Regular_font_table[] =
{
    {0x0000, 0x02, 0x01, 0x02, 0x00},         // Character - " ", Ascii - 32
    {0x0004, 0x01, 0x13, 0x03, 0x01},         // Character - "!", Ascii - 33
    ...
}
The font is a constant array just like our bitmap, to access a glyph the SSD1322 driver code will fetch the glyph location from the font table and use that to index the font array. The width, height and other parameters of the glyph will be used to draw the glyph on the screen. A font structure is used to represent the font array as expected. Note that we have a pointer to the font table in the font structure as well as a pointer to the font array.
typedef struct
{
    const uint8_t * address;
    const font_table_entry_t * font_table;
    uint8_t height;
    uint8_t max_descent;
} font_t;
We’ll initialize our font structure as shown in the code snippet below.
// Initialize font structure
const font_t Lato_Regular =
{
    (const uint8_t *) &Lato_Regular_font,
    (const font_table_entry_t *) &Lato_Regular_font_table,
    FONT_HEIGHT,
    FONT_DESCENT
};
Lastly we’ll have to expose our font structure in the header file so the rest of the application can have access.
// Font Structure
extern const font_t Lato_Regular;
Generating the text code
In order to display text, we’ll have to convert a font of our choice into source code just like we did for bitmaps/images. After some searching on the internet I found a library called freetype that could render fonts. Further searching led me to Dan Bader’s blog post on rendering fonts for embedded systems. We’ll use Dan’s code to render font glyphs in python and perform some further processing to make the font bitmaps compatible with our display. Now let’s organize the font data in a dictionary called “font_table” to make the work easier. Note that the actual rendering of the glyphs occur in the font_to_array() function as well as the creation of our “font_table”.
def font_to_array(filename, size):
    """
    Generates an 'array' representation of the font
    which is used to generate source and header files for the bitmap.

    filename (str): The font file which we wish to generate code for
    size (int): The maximum height of the font

    returns (tuple):
        A tuple containing font data.
        |
        |--> font_table (dict): A nested dictionary of glyph data
        |    |
        |    \--> char (str) : glyph data (dict)
        |                      |--> 'Width'    : glyph width (int)
        |                      |--> 'Height'   : glyph height (int)
        |                      |--> 'Location' : glyph index in font array (int)
        |                      |--> 'Baseline' : glyph baseline (int)
        |                      |--> 'Dummy'    : glyph data added to glyph width (int)
        |                      |--> 'Bitmap'   : glyph pixel array (list)
        |                      \--> 'String'   : glyph ascii representation (list)
        |
        |--> font_height (int): The maximum height of the font glyphs
        |
        \--> font_descent (int): The maximum descent below the baseline
    """
    fnt = Font(filename, size)
    font_table = {}

    # Prepare characters for rendering
    elements = ' ' + string.ascii_letters +  string.digits + string.punctuation
    elements.replace('//', '/')
    keys = [i for i in elements]
    keys.sort()

    # Get maximum font height and maximum descent
    font_parameters = fnt.text_dimensions(elements)
    font_height = font_parameters[1]
    font_descent = font_parameters[2]

    # Render and format characters
    glyph_location = 0
    glyph_size = 0

    for char in keys:
        if char == " ":
            # Manually insert the space character
            # Space is equal to 4 pixels
            font_table[char] = {
                                'Width'    : 2,
                                'Height'   : 1,
                                'Location' : glyph_location,
                                'Baseline' : 2,
                                'Dummy'    : 0,
                                'Bitmap'   : ["0x00", "0x00", "0x00", "0x00"],
                                'String'   : ["SPACE"],
                               }

            glyph_size = 4
            # Update the location of the next character in the font array
            glyph_location += glyph_size
        else:
            # Render character
            glyph = fnt.glyph_for_character(char)
            ch = glyph.bitmap

            # Format character
            bitmap_data = tuple()
            bitmap = [i for i in ch.pixels]
            bitmap_data, dummy_added = add_dummy_data(bitmap, ch.width, ch.height)
            glyph_bitmap = format_bitmap(bitmap_data[0])
            # Represent the width of the bitmap as the SSD1322 does, where each
            # column address represents 4 pixels.This requires a division by 2 (each byte represents 2 pixels)
            # but we divide by 4 because format_bitmap() halves the width of the bitmap.
            glyph_width    = bitmap_data[1] // 4
            glyph_height   = bitmap_data[2]
            glyph_string   = ch.__repr__()
            glyph_baseline = font_height - glyph.ascent - font_descent

            font_table[char] = {
                                'Width'    : glyph_width,
                                'Height'   : glyph_height,
                                'Location' : glyph_location,
                                'Baseline' : glyph_baseline,
                                'Dummy'    : dummy_added,
                                'Bitmap'   : glyph_bitmap,
                                'String'   : glyph_string.split('\n'),
                                }

            glyph_size = glyph_width * 2 * glyph_height
            # Update the location of the next character in the font array
            glyph_location += glyph_size

    return (font_table, font_height, font_descent)
Finally, we’ll write each rendered character into a source (.c) file. Writing the font array into a file occurs in the font_to_c() function. We’ll add associated comments as we generate the code.
def font_to_c(filename, size):
    """
    Generates font header (.h) and source (.c) files in the active directory

    filename (str): The filename of the font. The font has to be in the
                    active directory.
    size (int): The maximum height of the font in pixels

    Returns: None
    """
    # Remove file extension and leading digits
    file = filename.split('.')[0].lstrip(string.digits)
    # Replace punctuation characters with underscores
    t = {ord(i) : '_' for i in string.punctuation}
    file = file.translate(t)

    # Get font data
    font_table, font_height, font_descent = font_to_array(filename, size)

    # Generate font header file
    with open(file + ".h", "w") as f:
        f.write("/**\n"
                " * @File Name\n"
                " *   " + file + ".h\n *\n"
                " * @Description\n"
                " *   This header file provides access to the installed font\n"
                " *   This code was auto generated with ssd13322_resource_utility.py\n"
                " */\n\n"
                "/**\n"
                " * Section: Included Files\n"
                " */\n\n"
                "#include \"ssd1322.h\"\n\n"
                "// Font Structure\n"
                "extern const font_t " + file + ";\n")

    # Generate font source file
    with open(file + ".c", "w") as f:
        f.write("/**\n"
                " * @File Name\n"
                " *   " + file + ".c\n *\n"
                " * @Description\n"
                " *   This source file contains pixel data of the installed font\n"
                " *   This code was auto generated with ssd1322_resource_utility.py\n"
                " */\n\n"
                "/**\n"
                " * Section: Included Files\n"
                " */\n\n"
                "#include \"ssd1322.h\"\n\n"
                "/**\n"
                " * Section: Module Definitions\n"
                " */\n\n"
                "#define FONT_HEIGHT " + str(font_height) + "\n"
                "#define FONT_DESCENT " + str(font_descent) + "\n\n")

        # Write font table to file
        f.write("/**\n"
                " * Section: Font Table\n"
                " */\n\n"
                "// Font table contains glyph metadata\n"
                "const font_table_entry_t " + file + "_font_table[] =\n{\n")

        keys = list(font_table.keys())
        for i in keys:
            # Convert font parameters to hexadecimal strings
            location   = "0x%04X" % font_table[i]['Location']
            width      = "0x%02X" % font_table[i]['Width']
            height     = "0x%02X" % font_table[i]['Height']
            baseline   = "0x%02X" % font_table[i]['Baseline']
            dummy      = "0x%02X" % font_table[i]['Dummy']
            # Make a font table entry for the current glyph
            f.write("    {%s, %s, %s, %s, %s},         " % \
                    (location, width, height, baseline, dummy))
            f.write("// Character - \"{}\", Ascii - {}\n".format(i, ord(i)))
        # End of Font table
        f.write("};\n\n")

        # Write font data
        f.write("/**\n"
                " * Section: Font Body\n"
                " */\n\n"
                "// Each byte represents two pixels\n"
                "const uint8_t " + file + "_font[] = \n{\n")

        for char in keys:
            # Reset index counter
            index = 0
            # Write one line of current glyph data
            f.write("    // " + 72 * "*" + "\n")
            f.write("    // * Character - \"{}\", Ascii - {}\n".format(char, ord(char)))
            f.write("    // " + 72 * "*" + "\n")
            for i in range(font_table[char]['Height']):
                f.write("    ")
                for j in range(font_table[char]['Width'] * 2):
                    data = font_table[char]['Bitmap'][index]
                    f.write(data + ', ')
                    index += 1
                # Write one line of the current glyph string representation
                f.write("         //  " + font_table[char]['String'][i])
                f.write("\n")
            # Move to next glyph
            f.write("\n")
        # End of font array
        f.write("};\n\n")

        # Create and initialize font structure
        f.write("/**\n"
                " * Section: Font Structure\n"
                " */\n\n"
                "// Initialize font structure\n"
                "const font_t " + file + " = \n"
                "{\n"
                "    (const uint8_t *) &" + file + "_font,\n"
                "    (const font_table_entry_t *) &" + file + "_font_table,\n"
                "    FONT_HEIGHT,\n"
                "    FONT_DESCENT\n"
                "};\n")
Putting It All Together
So now all that’s left for us to do is to enjoy the fruit of our work. Therefore we’ll make calls to font_to_c() and bitmap_to_c() to create source code for our OLED project. These calls will lead to the creation of source (.c) and header (.h) files in our working directory. The files generated by the example below are “Lato_Regular.c” and “Lato_Regular.h” for the font file “Lato-Regular.ttf” as well as “resources.c” and “resources.h” for the bitmap files.
if __name__ == "__main__":
    # Ensure that the .bmp and .ttf files you're trying to generate code for
    # are in the working directory.
    font_to_c("Lato-Regular.ttf", 27)
    bitmap_to_c(["ok.bmp", "CN.bmp"])
What’s Next?
We’ll dive into the inner workings of the SSD1322 driver code in the next post. Additionally we’ll include the generated resources from this post into a microcontroller project and test it. You can access the code on Github.
References
This work is based on code written by Dan Bader, check out his blog post here: http://dbader.org/blog/monochrome-font-rendering-with-freetype-and-python.